Claude Code for Beginners: Your Friendly Guide to AI-Powered Development
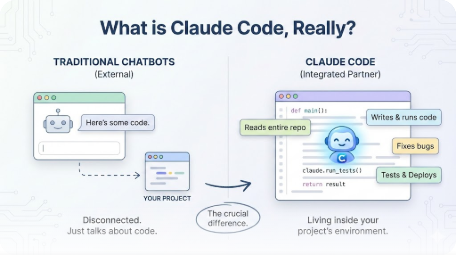
What is Claude Code, Really?
Imagine having a knowledgeable colleague who can look at your entire project, write code, run tests, and fix bugs - all while you describe what you want in plain English. That's Claude Code.
Unlike chatbots that just talk about code, Claude Code actually lives inside your project. It can see your files, create new ones, run commands, and implement features from start to finish. Think of it as the difference between asking someone directions over the phone versus having them walk beside you.
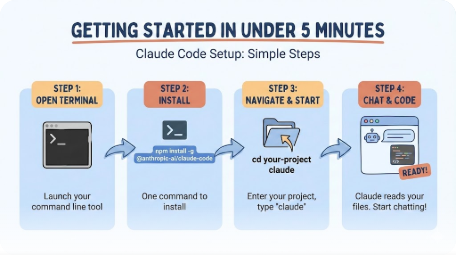
Getting Started in Under 5 Minutes
Getting Claude Code running is surprisingly simple:
- Open your terminal (the text-based window where developers type commands)
- Install Claude Code with one command
- Navigate to any project folder
- Type
claudeand start chatting
That's it. Claude reads your files automatically - you don't need to copy-paste code into a chat window. Just describe what you want: "Add a login button to the homepage" or "Why is this test failing?"
The first time you use it, try asking Claude to explain what your project does. It's a great way to see how it understands your codebase.
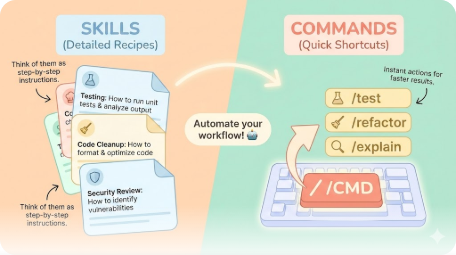
Skills and Commands - Your Shortcuts to Getting Things Done
Think of skills like recipe cards for Claude. Each skill tells Claude how to handle a specific type of task - whether that's writing tests, cleaning up messy code, or reviewing for security issues.
Commands are quick shortcuts that trigger these skills. Type /test and Claude knows to run your tests. Type /refactor and it starts cleaning up code. These shortcuts save you from typing long explanations every time.
Here's what makes them powerful: you can create your own. Have a specific way you like code formatted? Make a skill for it. Need Claude to always check certain things before committing code? Create a command.
Popular commands include:
/test- Run tests and fix failures/refactor- Clean up and improve code structure/explain- Break down complex code in plain English
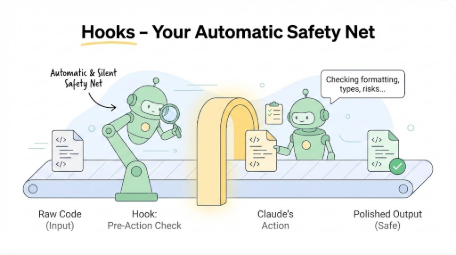
Hooks - Your Automatic Safety Net
Hooks are automatic triggers - things that happen before or after Claude takes action. They're like having a quality inspector who checks every piece of work.
For example, you can set up a hook that:
- Formats your code every time Claude edits a file
- Runs type checking after each change
- Warns you before any potentially risky command
The beauty is they work silently in the background. You don't have to remember to run the code formatter - the hook does it automatically.
There are different types of hooks:
- PreToolUse: Runs before Claude does something (like a safety check)
- PostToolUse: Runs after Claude finishes (like cleanup)
- Stop: Runs when Claude completes a task
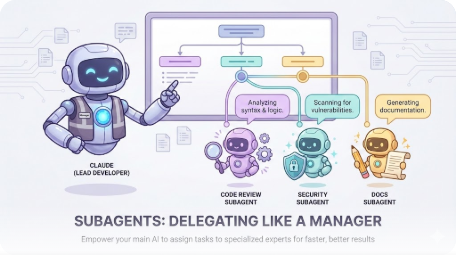
Subagents - Delegating Like a Manager
Sometimes a task is too big for one conversation. That's where subagents come in. They're specialized helpers that your main Claude can delegate work to.
Imagine you're the manager, Claude is your lead developer, and subagents are team members with specific expertise:
- One subagent handles code reviews
- Another runs security checks
- A third writes documentation
Each subagent gets its own workspace, so your main conversation stays clean. When they finish, they report back with results.
This is especially useful for:
- Complex debugging: Send a subagent to investigate while you keep working
- Parallel tasks: Have multiple subagents work on different features simultaneously
- Specialized reviews: Let a security-focused subagent audit your code
MCPs - Connecting Claude to Your World
MCP stands for Model Context Protocol. In simple terms, MCPs connect Claude to external services - your database, GitHub, deployment platforms, and more.
Without MCPs, you'd need to copy-paste data between Claude and your tools. With MCPs, Claude can:
- Pull data directly from your database
- Create GitHub issues and pull requests
- Deploy your code to production
- Search documentation for answers
Think of MCPs as bridges. Each bridge connects Claude to a different service. The Supabase MCP lets Claude talk to your database. The GitHub MCP lets it manage your repository.
Important tip: Don't enable too many MCPs at once. Each one takes up space in Claude's "memory" (context window). Keep only the ones you're actively using enabled.

Plugins - One-Click Superpowers
Plugins bundle everything together - skills, MCPs, and hooks - into easy-to-install packages. Instead of configuring each piece manually, you install a plugin and it handles the setup.
The official marketplace has hundreds of plugins:
- Code intelligence: Helps Claude understand your code better
- PR review tools: Automated code review for pull requests
- Language support: TypeScript, Python, and more
Installing plugins is straightforward:
- Browse the marketplace with
/plugins - Click to install
- Start using immediately
Like MCPs, be selective. Too many plugins slow things down. Enable what you need, disable the rest.

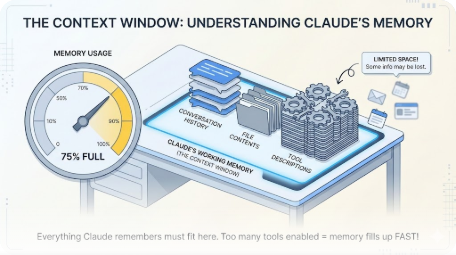
The Context Window - Understanding Claude's Memory
Claude has a working memory called the context window. Everything Claude needs to remember - your conversation, file contents, tool descriptions - must fit in this space.
Here's why this matters:
With too many tools enabled (MCPs, plugins), Claude's memory fills up before you even start. Performance drops, and Claude might forget important details from earlier in your conversation.
Practical tips:
- Start fresh sessions for new tasks
- Disable MCPs and plugins you're not using
- Use the
/compactcommand to compress long conversations - Check your context usage with
/context
A good rule: have many tools available, but keep only 10 or fewer enabled at a time.
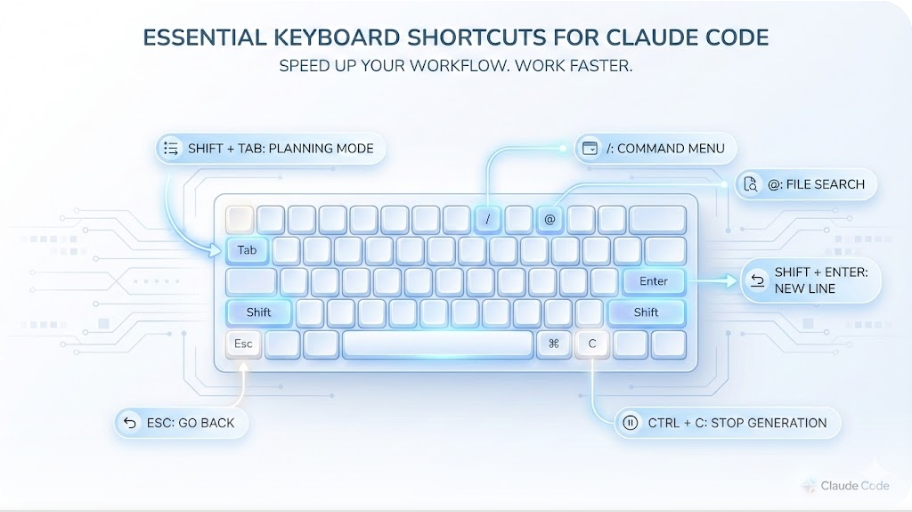
Essential Keyboard Shortcuts
Speed up your workflow with these shortcuts:
| Shortcut | What It Does |
|---|---|
| Shift+Tab (twice) | Enter planning mode - Claude thinks before acting |
| Esc (twice) | Go back to previous states |
| Shift+Enter | Add new lines without sending |
| Ctrl+C | Stop current generation |
| / | Open command menu |
| @ | Search for files |
The most underused shortcut? Shift+Tab for planning mode. It tells Claude to think through the problem before writing code. Great for complex tasks.
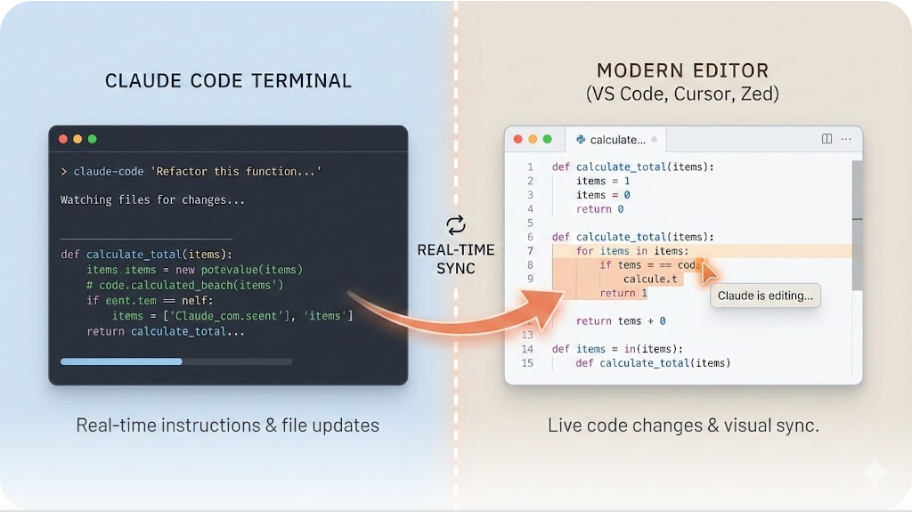
Working with Editors
While Claude Code works in any terminal, pairing it with a code editor makes life easier. You can watch files change in real-time as Claude edits them.
Popular pairings:
- VS Code / Cursor: Install the Claude Code extension for tight integration
- Zed: Fast, minimal, and works beautifully with Claude Code
- Any terminal: Claude Code is editor-agnostic
Pro tips:
- Enable auto-save so Claude always sees your latest changes
- Use split screen - terminal on one side, editor on the other
- Let your editor's file watcher show changes as they happen
Real-World Tips from Power Users
After researching how experienced developers use Claude Code, here are the tips that keep coming up:
Start with a plan: Before coding, ask Claude to outline its approach. Review the plan, then proceed.
Keep sessions focused: One task per session works better than marathon conversations.
Use CLAUDE.md files: Create a file that tells Claude about your project - coding standards, architecture decisions, things to always remember.
Leverage subagents early: For complex tasks, delegate to subagents from the start. Keeps your main conversation clean.
Don't fight the AI: If Claude misunderstands repeatedly, start fresh rather than pushing through a confused conversation.

Getting Started Today
The best way to learn Claude Code is to use it. Start small:
- Install Claude Code
- Open any project
- Ask Claude to explain what the code does
- Try adding a small feature
- Let Claude run the tests
Within an hour, you'll understand why developers call Claude Code a game-changer. It's not about replacing your skills - it's about amplifying them.
Ready to dive deeper? Check out the official documentation at code.claude.com and explore the plugin marketplace to customize your setup.
Want more insights?
Subscribe to get the latest articles delivered straight to your inbox.